
Semi Integrated Solar Street Lights generally have a separate solar panel, and the battery, controller, and LED are in another unit. A cable links the solar panel module and the light fixture. Their placement options offer greater installation flexibility and enable the solar panel to be positioned in a region that receives the most sunshine.
Solar panels are often mounted on the light pole or the Solar Street light ARM. This design provides greater flexibility, allowing you to choose the appropriate direction for the solar panel and also adjust the luminary to achieve better illumination. South-facing panels are the best and generally get more sunlight to the panel. This is because we live in the Northern Hemisphere, and the general rule is that solar panels face the true south.
Steps for installing semi integrated solar street lights
1. Charging:

Before using the light, let it charge for at least two days. Attach the solar panel to the luminary and charge the light during the day. Detach the solar panel wire from the luminary and switch it off at night. To help the battery calibrate, repeat these steps for two days.
2. Determine an Appropriate Location:
To ensure that the battery is efficiently charged, it's important to select a location where the solar panel will receive ample sunlight throughout the day. Make sure that there are no tree branches or shade obstructing the solar panel, as it needs direct sunlight to function properly.
3. Assemble the light:
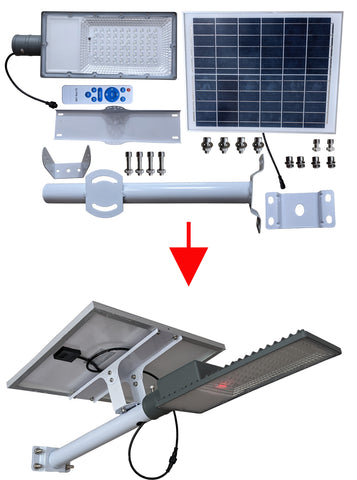
Assembling semi-integrated solar street lights is a simple process that usually involves two components: a solar panel and a luminary. All the necessary brackets and arms are provided in the box. To assemble the light, use the components provided and attach the solar panel. Adjust the panel's angle to ensure it receives maximum sunlight.
4. Prepare the Pole:
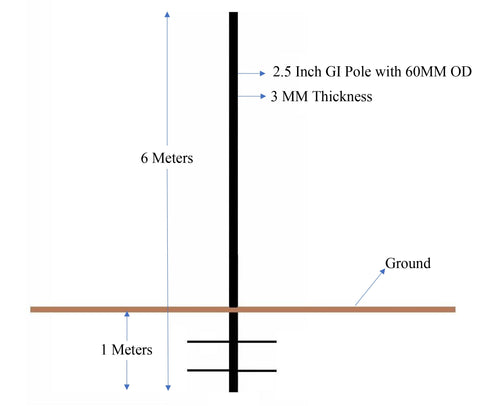
If you intend to install a light fixture on a pole, it is important to ensure that the pole is strong enough to support the weight of the fixture. Additionally, the pole should be tall enough, but not exceed 16 feet from the ground level, to provide adequate illumination coverage. A highly recommended pole for this purpose would be a 3.5mm GI pole with a 60mm OD.
5. Excavate the pole foundation pit:
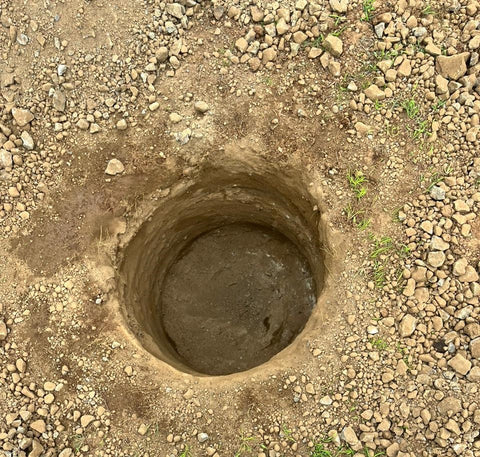
To lay the foundation of the pole, you need to dig a hole that is three to four feet deep. Check the site to ensure there is no other infrastructure, such as pipelines, cables, etc. that may interfere with the pole's foundation. If the surface soil is soft, make sure to excavate deeper and safeguard any other infrastructure in the area.
6. Check the System:
It is important to test the system before securing all the parts to ensure that everything works properly. To check if the light comes on, cover the solar panel to make it appear as if it is night time. It is advisable to ensure that everything is working correctly before putting up the pole.
7. Safeguard the Elements:
After you've ensured everything is operating as intended, it should firmly secure all parts to the pole or mounting surface.
8. Last Verifications:
To ensure optimal lighting coverage, verify all connections, tighten any loose bolts or screws, and adjust the positioning of the light fixture as necessary.
9. Set up the pole:
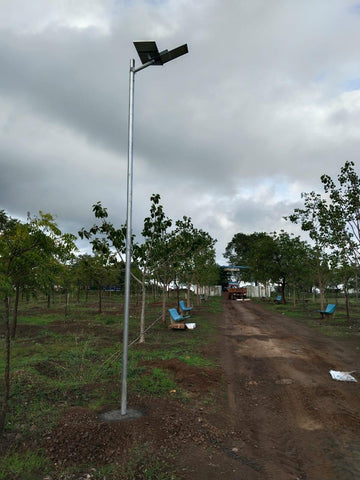
After securing the light to the pole, erect the pole and fill it with concrete and gravel. Install a cross beam to support the pole while the concrete dries.
These lights require less maintenance as they use renewable energy and have fewer parts than conventional street lights. This leads to a reduction in ongoing maintenance costs.
These lights are equipped with an intelligent sensor that automatically adjusts the brightness based on the battery percentage remaining. This feature ensures that the light can operate throughout the night while conserving battery power. Additionally, it's important to regularly charge and discharge the battery to help extend its lifespan and avoid damage.